ArgoCD For Beginners ⎈
Hey Everyone, welcome to the new blog. In today's blog we are going to learn about ArgoCD. So without wasting time let's get started.
What is ArgoCD?
ArgoCD is referred to as a declarative GitOps tool that is Kubernetes-based. Let's attempt to break this down. "GitOps" is a pattern where you take the code you have written and pushed to the Git registry (eg: GitHub, GitLab, Bitbucket) and bring it to the deployment and this is primarily done and executed as automation. The term "declarative" implies that the deployment has precisely the same architecture which you need and have chosen. So if ever there is a situation where something gets altered in the deployment then it will move back to the former state (the one which you have specified).
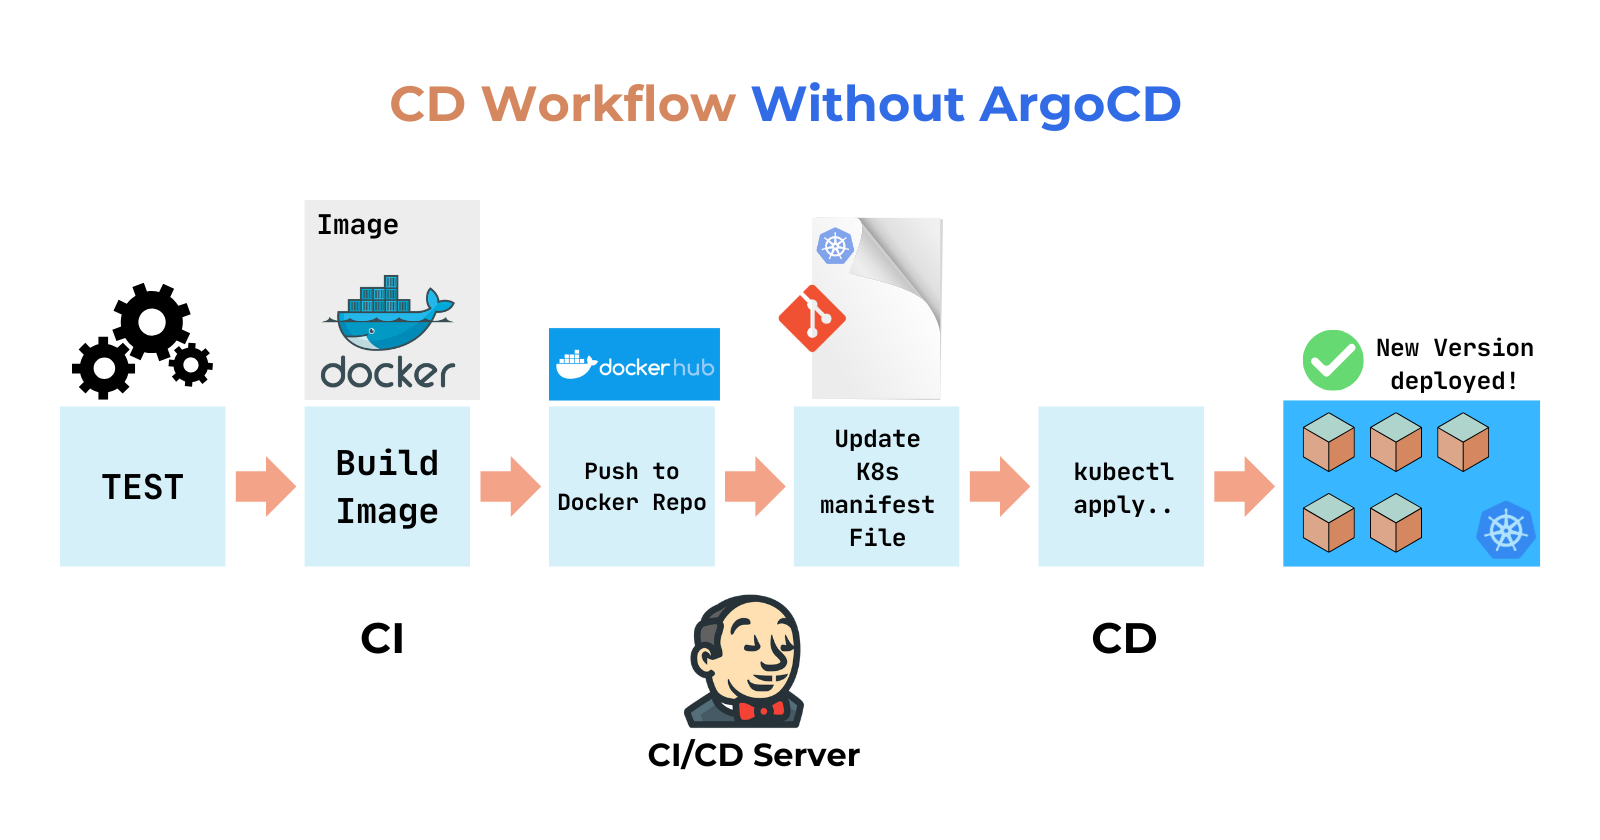
CD workflow without ArgoCD
So whenever the code changes are pushed to the git repository, they follow some series of steps that take them through to the deployment. These processes are automated and referred to as CI/CD pipeline. So after the code changes are pushed, they get tested, an image is created, pushed on the DockerHub or other registry, Manifest files are refreshed and lastly using kubectl apply. it is applied to the Kubernetes cluster.
But in this case, we have to face and resolve challenges like
Install and setup tools like kubectl
Configuring access to Kubernetes
Configuring access to cloud providers
Several security challenges
No visibility of deployment status
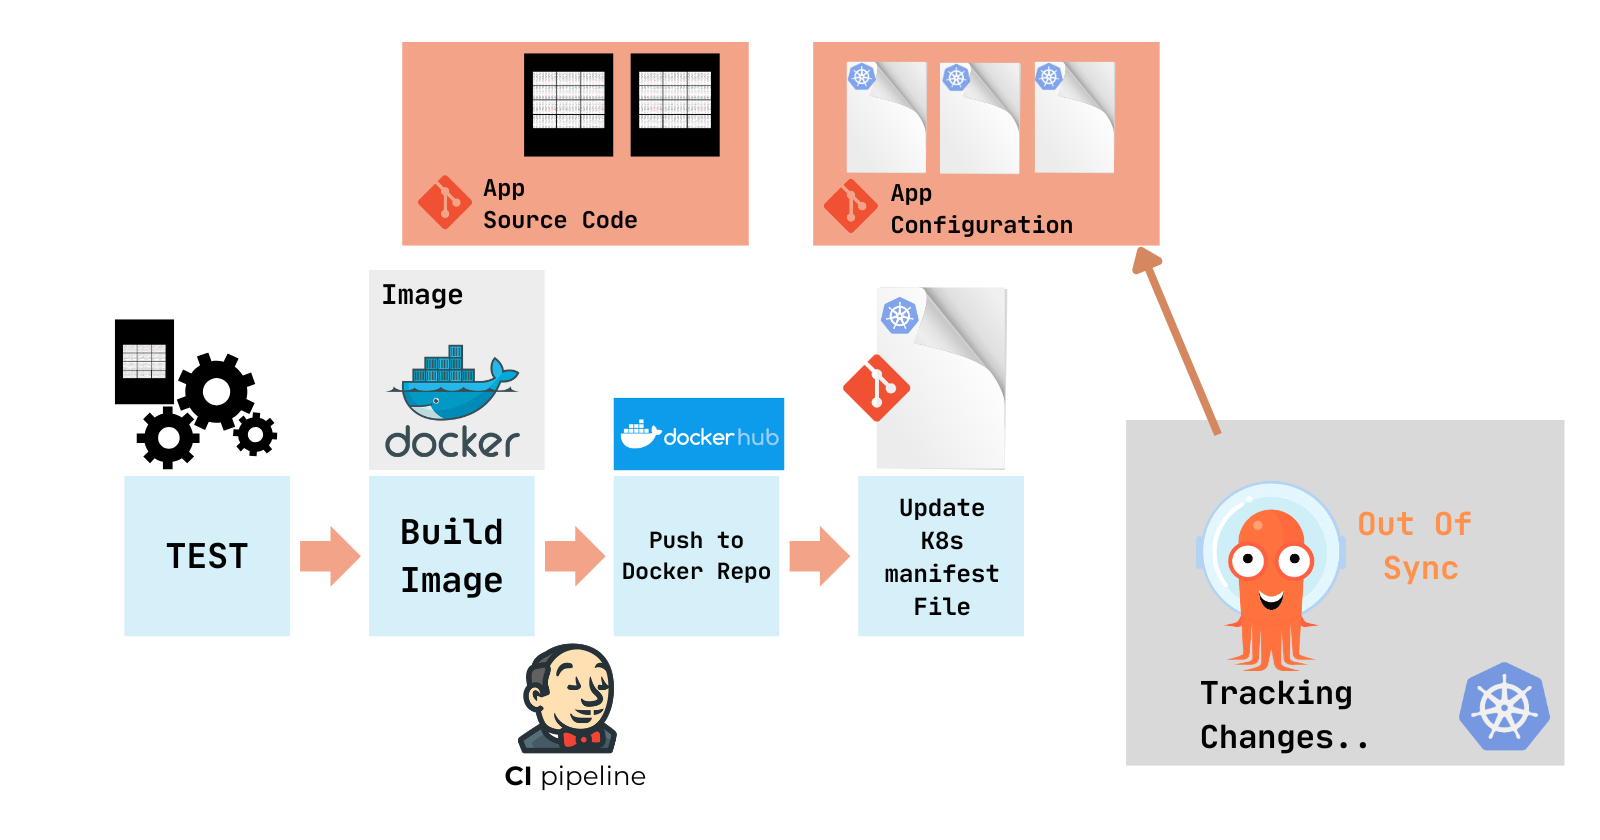
CD workflow with ArgoCD
So in a typical scenario the workflow described above is applied, but while using Kubernetes we may be required to modify this workflow. It is critical to understand that based on the established best practice of the Git repository, we must have two isolated repositories for Code files and application configuration (k8s manifests).
The primary benefit is there can be a point where we want to update only the config files but do not wish the test -> to build etc process to execute since the configs can be updated separately from the application compiled. Having this as a reference now ArgoCD (which is deployed on your Kubernetes Cluster) maintains the state you described in the configuration repositories.
So if were to use the earlier CI/CD pipeline then it would have been too difficult to manage and configure. Once the application is created and up the changes are reflected in the configuration files. These changes are detected by ArgoCD and pulled into the cluster.
***ArgoCD works on the pull method and not like the usual push method.***
Advantages of using ArgoCD
Git as a single source of truth:
That implies that if changes are to happen in the Kubernetes cluster then the git repository is a location where one can check and verify whether everything is proceeding as stated in the manifests and any instance which is out of instructions is being rolled back.
Easy Rollback:
This is a very necessary feature of ArgoCD as it allows us to go back to the former state if something was wrong or misconfigured with the cluster.
Cluster Disaster Recovery (CDR):
So if one of my servers fails then I can deploy another cluster with ArgoCD and reference it to the same repository then recovery process becomes really more efficient and quick.
Kubernetes Access Control:
We can control the access to the cluster directly using git so that we do not have to deal with granting the cluster access to an external tool.
Lets Experiment with it..
ArgoCD is very simple to install and set up. We are going to see it from an example perspective.
Install ArgoCD into your cluster using the following commands.
kubectl create namespace argocdkubectl apply -n argocd -f https://raw.githubusercontent.com/argoproj/argo-cd/stable/manifests/install.yamlNow that we have installed the argocd in the argocd namespace we can now create a yaml file with the following code. I will name the YAML file as
application.yaml.apiVersion: argoproj.io/v1alpha1 kind: Application metadata: name: wmd-argo-application namespace: argocd spec: project: default source: #Your repo link here repoURL: https://github.com/argoproj/argocd-example-apps.git targetRevision: HEAD #Location where the manifests are stored path: ArgoCD/dev destination: server: https://kubernetes.default.svc namespace: wmd syncPolicy: syncOptions: - CreateNamespace=true automated: selfHeal: true prune: trueCreate a
devfolder and place your deployment and service files into it.Create a namespace for our application.
 # You can give any name to your namespace and update respective files
 kubectl create namespace wmd
Now we have to apply the
application.yamlfile to the cluster. We can do that using thekubectl applycommand like below.kubectl apply -f application.yamlLet's go and check out it on the ArgoCD dashboard. To see the dashboard run the following command on your terminal.
kubectl port-forward svc/argocd-server 8080:443 -n argocdand now you can go to
http://localhost:8080to access the ArgoCD dashboard.In the
Usernamefield enteradminand to generate a password run the following commands into the terminal.kubectl get secret argocd-initial-admin-secret -n argocd -o yamland you will get output something like
 apiVersion: v1
 data:
   password: VktPYkNUZGZRcjNVk1ibQ==
 kind: Secret
 metadata:
   creationTimestamp: "2023-02-14T14:27:52Z"
   name: argocd-initial-admin-secret
   namespace: argocd
   resourceVersion: "1126"
   uid: c830da0d-8ff2-4719-8c5d-6cde9faf44e8
 type: Opaque
We are not done yet, copy the password in this case mine will be
VktPYkNUZGZRcjlNVk1ibQ==now put this password into another command to decode it and obtain the real password. Run the following command to decode it.# Change after echo with your password echo VktPYkNUZGZRcjlNVk1ibQ== | base64 --decodeNow copy the password that is obtained (Remember to omit
%at the end of the password obtained) and put it into the ArgoCD dashboard.Now you will be able to view the application in the dashboard.
Click on the application name and you are able to see a beautiful map of your deployment.
You could find all the possible information regarding the cluster here such as the pod, cluster, and service health. ArgoCD fetches the changes every 3 minutes this could be altered using webhooks and other approaches.
And it's done you have successfully installed and used ArgoCD to your cluster now whenever you need to make any changes in the deployment then directly you can modify the manifest and push the code to git repository and changes will be reflected in ArgoCD automatically.
Resources
Thank you so much for reading 💙
Like | Follow | Subscribe to the Newsletter.
Catch me on my socials here: https://bio.link/yashpawar


